Saturday, December 5, 2020

Stand and Deliver Worked -- This Time

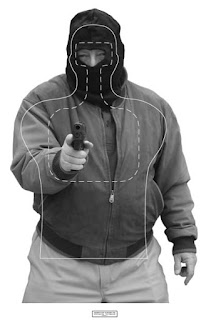
The First Shot--Notice the Bad Guy is Aiming at the Officer
Putting your hand on your pistol if there is any indication of an impending deadly threat can significantly cut your response time. I first addressed this subject in an article responding to the change in Texas law permitting open carry—this is an update to that article.* 

In the original article I mentioned research from Vickers and Lewinski who discovered that more experienced police officers placed their hand on their pistol and often drew their pistol earlier in a confrontation and thereby gained precious time in responding to a threat—often shooting before the threat could fire at them. **

In the video below, a police officer in Uruguay does exactly that. As he is sitting eating ice cream, he notices two men approaching and obviously triggers on them for some reason--he immediately obtains a firing grip on his concealed pistol. As one of the perpetrators begins to draw a pistol, an instant later the police officer starts to stand and begins drawing his pistol as well.

The armed perpetrator initially holds his pistol at his side; however, suddenly realizing his erstwhile victim is drawing a pistol the perpetrator brings his own pistol into a firing position aiming at the police officer. Unfortunately for the perp, the officer completes his draw and fires .04 seconds later, before the perp could pull his own trigger. The total time from the police officer initiating his draw to his first shot was 0.73 seconds. As an aside, the officer either missed with the first shot or the bullet went through the perp. You can see the bullet strike the wall behind the perp in the lower left corner of the screen.


The Vickers and Lewinski research prompted me to collect data to determine how much of a time advantage you can gain through placing your hand on the pistol versus starting with your hands in some other location (e.g. hands at sides). My goal was to determine how long it took a competitor (granted, not necessarily the average private citizen licensed to carry) to draw and fire single shot from different starting positions.

We have now timed the draws of 362 individuals over a period of several years during our local IDPA and Sensible Self Defense Short Range matches. We have measured 2458 specific instances of drawing the pistol and firing a shot from concealment, 1627 draws with the pistol not concealed, and 1349 instances when the competitor started with their hand on the holstered pistol. We only included instances where the competitor's shot stuck inside the -1 or 0 of the standard IDPA target or the Shootsteel target in the data set.

The skill level of the competitors has varied from new shooters participating in their first practical match, Novices, Marksmen, Sharpshooters, Experts, and two Masters--unfortunately we have few Master class shooters in our local matches.

We have discovered that for all experience levels, placing your hand on a concealed or openly carried pistol early in a dangerous situation can provide a 0.75 to 1.75 second time advantage (depending on the individual skill level) if you must draw compared to starting with the hands in some other position. This is not trivial—3/4th of a second to 1-3/4 seconds faster can be a lifetime in a deadly confrontation as we saw in the video.

If the police officer had started his draw from a neutral position without his hand on the pistol, it is highly probable that the perpetrator would have fired first—four one-hundredths of a second is 2.5 times faster than the average human eye can blink.

Trying to draw a pistol in a “Stand and Deliver” response to a criminal’s drawn pistol is a great way to get shot if the criminal is committed and paying attention. In an experiment we conducted in 2016 we found that even when the good guy had the initiative, in 98 out of 100 trials the bad guy fired first. We had one tie where both the good and the bad guy fired simultaneously and one instance where the good guy fired first.

Does Stand and Deliver work?  Sometimes. If you time your response or if the get inside the bad guy's decision cycle, a Stand and Deliver response can work as we saw in this incident.

If you enjoy reading these please subscribe. The link is on the upper right side of the page. All that will happen is that you will receive an e-mail when I post an article. Your information will never be distributed.

Come out and shoot with us on the second Sunday of every month at Cedar Ridge Range in San Antonio, Texas.

For more information go to: www.sensibleselfdefense.com

* Is placing your hand on a holstered pistol a violation of the law as long as the pistol remains in the holster? I’m not a lawyer and this is not legal advice; laws vary by state—check your local laws as appropriate.

**You can find this article on the Force Science website at:
https://www.forcescience.org/2009/10/major-new-study-how-your-eyes-can-cast-your-fate-in-a-gunfight-part-1/

Monday, November 16, 2020

A California Pistol Qualification -- Blindfolded

A local retired law enforcement officer (LEO) recently asked me to assist him with a LEOSA requalification to demonstrate that he met his former California agency’s qualification standards. At the range, he provided me with a copy of the prescribed course of fire on his former agency’s letterhead.

We set up the target and I ran him through the qualification course with his Glock 9mm and his S&W .38 Special J-frame revolver. He scored 100% with his Glock and 86% (passing) with his snubbie.

I asked him about the course of fire and he assured me that it was the current standard for his former agency and that the agency had used this qualification standard when he had been an active LEO. 

I was so impressed with the qualification standard’s complexity and difficulty that I asked the retired LEO to witness me shooting the qualification—blindfolded. I did it blindfolded to ensure that there was no question about me being able to see the target in any way. I scored a 100% on the qualification.

The qualification course of fire was as follows:

-- 1-yard line: 5 shots, two strings of fire. String 1: draw and fire 3 shots with the primary hand only within 6 seconds. String 2: draw and fire 2 shots with the primary hand only
within 6 seconds.

-- 3-yard line: 5 shots, one string of fire. Draw and fire 3 shots with the primary hand only, switch the pistol to the other hand and fire 2 shots using only that hand
within 8 seconds.

-- 5-yard line: 5 shots, one string of fire. Draw and fire 2 shots with the primary hand only, switch the pistol to the other hand and fire 3 shots using only that hand
within 8 seconds.

If you objectively look at this course of fire it would seem that it would be impossible to fail. The retired LEO assured that that he had in fact seen colleagues in his former agency fail. 

When we compare this course of fire to the standards for the Texas License to Carry (LTC) test the differences are stark. The Texas LTC qualification requires 50 rounds at distances of 3, 7, and 15 yards. 

My experience with 1000+ LTC applicants is that very few fail the Texas LTC qualification. I have literally had students take a brand new pistol out of its box, remove the tags, and qualify; even though that was the first time they had ever touched a pistol in their life.

Many police officers are competent with their sidearms and some maintain their skills through competition and practice.  Others, like people in many professions, are satisfied with the minimum standard.  Although the California agency in question may have budgetary or other reasons for this simplistic qualification, I cannot help but think the agency is doing its officers and the public they serve a disservice. 


If you enjoy reading these please subscribe. The link is on the upper right side of the page. All that will happen is that you will receive an e-mail when I post an article. Your information will never be distributed.


Thursday, November 5, 2020

Origins of the Failure Drill or the “Mozambique Drill”

Retired Marine Lt Col Jeff Copper is arguably the father of the modern pistol craft that Massad Ayoob, Tom Givens, John Farnam, and a variety of others teach. Cooper published a number of books and I highly recommend them. Many today do not know of Jeff Cooper and his prolific writings and I intend to do a small part in correcting that through periodic quotes that may be relevant to the self-defense topics I discuss in this blog. Constructive comments as always are welcome.

Jeff Cooper originally promulgated what is now often known as a “failure drill” as the “Mozambique Drill.”

Jeff Cooper's Commentaries Vol. 1, No. 1; June 1993

Per Jeff Cooper:

"As time passes, we discover that there are a good many readers who have not been to school and who are puzzled by our reference to "The Mozambique Drill."

I added The Mozambique Drill to the modern doctrine after hearing of an experience of a student of mine up in Mozambique when that country was abandoned. My friend was involved in the fighting that took place around the Lourenço Marques airport. At one point, Mike turned a corner was confronted by a terrorist carrying an AK47. The man was advancing toward him at a walk at a range of perhaps 10 paces. Mike, who was a good shot, came up with his P35 and planted two satisfactory hits, one on each side of the wishbone. He expected his adversary to drop, but nothing happened, and the man continued to close the range. At this point, our boy quite sensibly opted to go for the head and tried to do so, but he was a little bit upset by this time and mashed slightly on the trigger, catching the terrorist precisely between the collar bones and severing his spinal cord. This stopped the fight.

Upon analysis, it seemed to me that the pistolero should be accustomed to the idea of placing two shots amidships as fast as he can and then being prepared to change his point of aim if this achieves no results. Two shots amidships can be placed very quickly and very reliably and they will nearly always stop the fight providing a major-caliber pistol is used and the subject is not wearing body armor. However, simply chanting "two in the body, one in the head" oversimplifies matters, since it takes considerably longer to be absolutely sure of a head shot than it does to be quite sure of two shots in the thorax. The problem for the shooter is to change his pace, going just as fast as he can with his first pair, then, pausing to observe results or lack thereof, he must slow down and shoot precisely. This is not easy to do. The beginner tends to fire all three shots at the same speed, which is either too slow for the body shots or too fast for the head shot. This change of pace calls for concentration and coordination which can only be developed through practice.

Mike Rouseau was later killed in action in the Rhodesian War. May he rest in peace!"

Sunday, October 25, 2020

Steve's House -- A Home Defense Scenario

In a recent Sensible Self Defense Short Range Match we set up a stage replicating a home defense scenario. The stage copied the angles present in my friend’s house as he comes out of the master bedroom.⁣ ⁣⁣⁣ ⁣⁣

To correctly make the best use of cover, I engaged the first three targets with the shotgun on my left shoulder (mirror image). As I moved forward, I transitioned to the right shoulder and engaged the remaining targets.⁣ ⁣⁣⁣ ⁣⁣

I was firing Fiocchi 9-pellet buckshot on this stage. The Fiocchi 9-pellet buckshot load weighs 486 grains. At 1325 FPS it has a muzzle energy of 1895 foot pounds. The targets are AR400 steel 2/3 size IDPA silhouette targets and weigh about 40 lbs. As you can see, the impact of the 00 buckshot really rocks these targets. 

The most distant potential engagement distances in Steve's house vary from 7-12 yards.  We placed the first set of targets in this scenario at eight yards, the next set at 10 yards, and the final set at 12 yards. 

Multiple projectile loads require particular attention to what is behind your target. YOU are responsible for every pellet you fire and every pellet can maim or kill. This is where target distance and the pattern of a particular load in your shotgun comes into play. 

The Fiocchi 9-pellet 00 buckshot load from my Beretta 1301 shotgun at 15 yards generally puts all nine pellets within a 10 inch circle. As you can see from the video below, all pellets from my 1301 likely struck the steel target even though I did not always have a perfect center hit.


Would I be comfortable using the Fiocchi 9-pellet 00 buckshot load?  If necessary, yes; however, there are better loads available. The Federal 8-pellet 00 Buckshot loads with the  FLITECONTROL® wad, the Speer Lawman with the same wad, or the Hornady 00 Buckshot load with the Versatite™ wad all seem to perform well in most shotguns. These loads typically throw an an 8-inch spread within 20 yards—the absolute outer limit for most urban home defense scenarios. This is
an acceptably tight pattern for home defense scenarios. 

I am convinced that the 12 gauge shotgun is the perfect home defense firearm. I have always been impressed with the shotgun’s effectiveness and power and the work I have done recently with the platform has reinforced my belief in the shotgun as a defensive tool. When employed correctly and within its proper range envelope the shotgun is very effective.

We periodically have shotgun matches at Cedar Ridge Range in San Antonio. ⁣⁣⁣ ⁣⁣

For more information go to:⁣ ⁣⁣⁣ ⁣⁣www.sensibleselfdefense.com ⁣⁣
 

Tuesday, September 29, 2020

Some Thoughts on Carry Ammunition

I firmly believe that you should always use factory ammunition for personal protection carry. When you purchase your chosen personal protection ammo from a reputable company always try to purchase 3 boxes of the same lot. I know ammo is expensive; however, isn’t your personal protection ammunition more important than a few high-priced cups of coffee? 

You should examine every round for proper primer seating, case integrity, and bullet defects. Fire a few rounds from one box to confirm your pistol’s zero and point of impact with that lot of ammunition. After you load your magazines for carry save at least five rounds in the box. If you ever find yourself in a short range defensive situation, the forensics examiner can use the ammunition sample from the lot that you have saved to verify distances with powder testing. Large ammunition makers keep samples for each lot for exemplar testing for 10 years as well.

What about rotating your ammunition? I rotate my carry ammunition every six months and always confirm that the point of impact for a new lot is where I expect it to be. What do I do with the ammunition I retire from my carry pistol? I place them in a box and when I have enough to fire a standard qualification for practice, I use that ammunition. This lets me reaffirm that my pistol functions with my carry rounds and reminds me what firing that ammunition feels like.

A good practice when loading and unloading your pistol is to rotate the rounds in the magazine so that you are not always chambering the same round. Repeated chambering may eventually cause the bullet to set back in the case and could damage the hollow point’s opening, the cartridge rim, etc. I know it is a pain; however, periodically removing all the rounds in the magazine and placing the #1 round in the #15 (etc.) position will minimize the potential damage.

For Winchester’s view on rotating your ammunition (courtesy of Massad Ayoob) please see the following: Common Sense Duty Ammunition Rotation

If you enjoy reading these please subscribe. The link is on the upper right side of the page. All that will happen is that you will receive an e-mail when I post an article. Your information will never be distributed.

Friday, September 25, 2020

John Dean "Jeff" Cooper--The Father of Modern Pistol Craft

I do not believe that it is an overstatement to say that Jeff Copper was the father of the modern pistol craft that Massad Ayoob, Tom Givens, John Farnam, and a variety of others teach.
Cooper also founded Gunsite Academy which continues to provide outstanding firearms instruction. 

Jeff Cooper published a number of books and I highly recommend them. Many today do not know of Jeff Cooper and his prolific writings. I intend to do a small part in correcting that through periodic quotes that may be relevant to the self defense topics I discuss in this blog. Constructive comments as always are welcome.

Jeff Cooper's Commentaries, Vol. 12, No. 9, 07/2004

Considering the principles of personal defense, we have long since come up with the Color Code. This has met with surprising success in debriefings throughout the world. The Color Code, as we preach it, runs white, yellow, orange, and red, and is a means of setting one's mind into the proper condition when exercising lethal violence, and is not as easy as I had thought at first. There is a problem in that some students insist upon confusing the appropriate color with the amount of danger evident in the situation. As I have long taught, you are not in any color state because of the specific amount of danger you may be in, but rather in a mental state which enables you to take a difficult psychological step.

Now, however, the government has gone into this and is handing out color codes nationwide based upon the apparent nature of a peril. It has always been difficult to teach the Gunsite Color Code, and now it is more so. We cannot say that the government's ideas about colors are wrong, but that they are different from what we have long taught here.

The problem is this: your combat mind−set is not dictated by the amount of danger to which you are exposed at the time. Your combat mind−set is properly dictated by the state of mind you think appropriate to the situation. You may be in deadly danger at all times, regardless of what the Defense Department tells you. The color code which influences you does depend upon the willingness you have to jump a psychological barrier against taking irrevocable action.


Sunday, September 6, 2020

A Cheap Shotgun for Home Defense?

Do you really need an expensive shotgun for home defense? My friend Steve and I did an experiment with a number of older shotguns and discovered that with the proper ammunition, even older shotguns performed very well and would be suitable for home defense.

The proper ammunition in my opinion is the Federal LE-133 8-pellet #00 Buckshot loads using the  FLITECONTROL® wad, the Speer Lawman using the same wad, or the Hornady #00 Buckshot load with the Versatite™ wad. All three seem to perform well in most shotguns and throw an acceptably tight pattern within 20 yards—the absolute outer limit for most urban home defense scenarios.

Recoil wise, the Federal and the Speer 8-pellet #00 Buckshot load's velocity is 1145 foot per second (fps) while the Hornady #00 Buckshot load leaves the barrel at 1600 fps so the felt recoil for the Hornady load will be greater.

Multiple projectile loads require particular attention to what is behind your target. YOU are responsible for every pellet you fire and even a single pellet can maim or kill. This is where target distance and the pattern of a particular load in your shotgun come into play. 

For example, the Fiocchi 9-pellet #00 buckshot load from my Beretta 1301 shotgun at 15 yards generally puts all nine pellets within a 10 inch circle. I say generally because occasionally this load throws one wild pellet off the target at that distance. This is also true with the Federal 9 pellet loads as well as the Winchester and Remington 9 pellet loads. Interestingly the Speer Lawman 8 pellet load does that as well. However, the Federal 8-pellet LE-133 #00 Buckshot load consistently puts all 8 pellets through a hole 2 inches in diameter at 15 yards in my gun.

9th Pellet Flyer

The patterns below fired at 15 yards show our results with several older, and in some cases much cheaper shotguns. The center "A" circle is 9-inches in diameter.


Both barrels of the old double shown below were acceptable with the Federal 8 pellet load.

Even the cheap single shot fired a great pattern with the Federal FLITECONTROL®

You get the idea. Should you modify your shotgun?  That depends entirely on your goal.  If it is a family heirloom or has some value in its existing configuration then I would not modify it.  

Longer barrels certainly are not as handy for moving around a furnished room or other obstacles. If it makes sense to modify your shotgun, then consider cutting the barrel to a legal 18-1/2 - 20 inches. Previous owners cut down the barrels of the Remington Model 11 and the Marlin 1989 Pump shown above. 

A competent gunsmith can do this with little effort if you would like a shorter barrel. The picture below is of a Mossberg 500 Youth Model that originally came with a 24" barrel.  A local gunsmith cut the barrel to 18-1/2 inches, reset the bead, and refinished it.  


If you have a common shotgun such as the Mossberg 500 or Remington 870 and wish to spend a little more money, you can add some useful aftermarket accessories.  I purchased the police surplus 870 shown below for less than $200.00--of course this was before the 2020 gun buying frenzy.  

I added a Magpul stock to make the shotgun a little more comfortable to shoot and an Aridus Industries quick detach shell carrier for on-gun reloads.  Although acceptable before, this surplus 870 is now a very good home defense shotgun.

With the proper ammunition, granddad's old shotgun is completely suitable for home defense. However, you should go to the range and pattern your particular gun with the ammunition you would like to use.  Patterning your load lets you know exactly where the gun shoots and at what range the pattern is too large for home defense purposes.

If you enjoy reading these articles please subscribe. The link is on the upper right side of the page. All that will happen is that you will receive an e-mail when I post an article. Your information will never be distributed.


Sunday, August 16, 2020

Shooting the US Department of Energy (DOE) Protective Force Shotgun Qualification

This is the US Department of Energy (DOE) Protective Force Shotgun Qualification. The Department of Energy Protective Force Teams are the guys and gals that guard nuclear weapons and nuclear facilities—they are serious. The course of fire is straight forward and requires ten rounds of buckshot. The DOE qualification is fired on the DOE standard target with all pellets on the target counted as one point. The shooter must score 90% to pass at the SPO-III or Special Response Force/Tactical Response Force level.

The Stages:

7 yard line - 4 Rounds:

     -- Shotgun Loaded with 3 rounds

     -- Charge, and fire 2 rounds. Load 1 round in the magazine tube, and fire 2 rounds

Time: 12 Seconds

15 yard line – 4 Rounds:

     -- Shotgun Loaded with 2 rounds

     -- Charge, and fire 2 rounds from a standing position.

     -- While kneeling, load 1 round through the ejection port and close the action, load 1 round in the magazine tube, and fire 2 rounds

Time: 15 seconds

25 yard line - 2 shots:

     -- Shotgun loaded w/ 2 rounds

     -- From standing, Charge and fire one round, kneel and fire one round

Time: 6 Seconds

I fired the qualification using the DOE standard target. I covered the target with a t-shirt to reduce the damage the shotgun wads cause (even so, the large gaping holes are from the impact of shotgun wads).

I used the Speer Law Enforcement 8 pellet buckshot that has the Federal Flitecontrol wad. My Beretta 1301 is a 25-yard plus gun with the Speer and Federal 8 pellet buckshot loads with a typical pattern of six inches at 25 yards. The pictures below show a Federal 8 pellet buckshot round that I fired at an old (2003) Level II body armor panel. The pellets were clearly still in the Flitecontrol wad at seven yards and all the pellets fused into one mass. The Flitecontrol wad was embedded in the same hole as well. The round did not penetrate the Level II panel. 

Federal 8 Pellet Flitecontrol--All Pellets Fused into One Mass

In my Beretta 1301 the Speer 8 pellet buckshot load does occasionally throw one-pellet “flyers” outside the pattern as shown in the picture below from a previous qualification. I am not certain why this happens but it does. My 1301 does not particularly like the Hornady 12 Gauge 00 Buckshot Critical Defense with the Versatite load either and will have much larger patterns with occasional flyers at a given distance.

Previous Qualification Speer 8 Pellet Buckshot "Flyer"

The Speer rounds I fired in this qualification performed as advertised without flyers and the DOE target contained all 80 pellets which is 100% or a perfect score. The video below shows the entire course of fire.


It is a good idea to demonstrate and document your competence for record with any firearm you might use for self-defense. Since I use a shotgun as a home defense weapon, I periodically fire qualifications with my shotguns.

What course of fire should you use? There are several approaches you can take in choosing which course of fire to use to demonstrate competency. For the shotgun, I recommend the Department of Energy Shotgun Qualification course discussed here or your state qualification course. The Texas Commission on Law Enforcement (TCOLE) for example has a Shotgun Instructor Qualification that police firearms instructors must pass to receive TCOLE firearms instructor certification in Texas.

The only FBI Qualification I was able to locate was from 2000; however, given the general status of the shotgun in contemporary police doctrine it is likely still the standard. The FBI qualification is weighted toward slugs and is the only course that has 50 yard targets.

Georgia State Shotgun Qualification requires the use of cover and incorporates head shots. It also requires the transition to your handgun when the shotgun runs dry.

The Massachusetts Municipal Police Training Committee or MPTC Shotgun Qualification incorporates shotgun operation fundamentals and marksmanship including loading, firing from different positions, reloading, cover, movement, pivoting left and right, etc. It is a very comprehensive course of fire that I will shoot in the near future. Lee Weems in a post stated that the Georgia Association of Law Enforcement Firearms Instructors uses this qualification in their Shotgun Instructor course as well.

Regardless of the course of fire you chose, fill out a qualification sheet and have a witness sign it. Demonstrating competence with your firearm can short-circuit the potential prosecutor’s tactic of arguing that you discharging of the firearm was an accident or negligent act rather than intentional self-defense. Remember that the claim of self-defense is for an intentional act, not for an accident or negligence.

If you enjoy reading these please subscribe. The link is on the upper right side of the page. All that will happen is that you will receive an e-mail when I post an article. Your information will never be distributed.

Georgia Shotgun Qualification (GASQ)

SQT A-1
SQT A-1
I. FIREARM: Standard Service 12 Gauge shotgun semi-automatic or pump action shotgun

II. AMMUNITION: 4 rounds 12 gauge slugs; 6 rounds 12 gauge 8 or 9 pellet "00" buckshot; 2 rounds handgun

III. TARGET: (two targets per shooter)

IV. CLOTHING: Issued duty gear, eye and ear protection.

V. SIGHTS: It is highly recommended that agencies and instructors have the officers pattern their shotguns on an SQT A1 target from distances of 3, 7, 10, 15, 20 and 25 yards in order to identify where the pellets begin leaving the target scoring zone identifying the shotgun ammunition's maximum spread.

VI. GENERAL: All reloads are the shooter's responsibility. If the shooter encounters a malfunction from 25 yards or less, they may transition to the sidearm and complete that stage. Rounds may be made up at the stage where problems or malfunctions occur, but only within the allotted time limits for that stage.

VII. SCORING: Slugs and handgun rounds will be scored 2 points each for “A” zone hits and 1 point each for hits outside the “A” zone but still within the scoring area. Total possible points for four slugs and two handgun rounds will be 12 points. "00" buckshot will be scored as 1 point for each hit within the scoring area of the (2) targets. Total possible points for the 8 pellet buckshot is 48 points. Total possible points for the 9 pellet buckshot is 54 points.

Maximum Raw Score: 60 (8 pellet buckshot)

66 (9 pellet buckshot)

Minimum Qualifying Score: 48 = 80% (8 pellet buckshot)

53 = 80% (9 pellet buckshot)

VIII. SAFETY: During the course of fire while reloading or clearing a malfunction, the shooter will maintain muzzle and trigger finger discipline, weapon pointed down range and finger off of the trigger and outside the trigger guard. While moving the safety will be engaged, finger off of the trigger and outside the trigger guard and muzzle pointed down range. 

While loading the shotgun, the shooter must visually and physically inspect each round of ammunition before loading the round into the weapon. Special care must be taken to differentiate between slugs and buckshot ammunition. 

Road Ready / Gun Box Condition: The action is forward on an empty chamber, the magazine is loaded, and the safety is on. 

Low Ready / Cover Positions: The Low Ready position is defined as shotgun stock in shoulder, weapon pointed down range, safety on and finger off of the trigger and outside the trigger guard. The shotgun will be pointed just below the target so as to clearly observe the suspect’s hands. 

The Covering Offset position is defined as pointing the weapon in a safe direction left or right of the target. This is advantageous when utilizing the prone position. 

Covering the target: The target does not become a threat until it is either presented (moving or turning targets) or sound/verbal indicator command is heard.

VII. COURSE:

Stage One: 25 yard line, 2 strings of fire, use of cover, 2 slug rounds. Instructor: Once all students are on the 25 yard line have the shooters load the shotgun to gun box / road ready condition with two slugs in the magazine tube and handguns will be loaded and holstered with a full magazine.

String 1- Right side of cover: 4 seconds one iteration Standing outside of cover at a low ready position, on command the shooter will move behind cover, chamber a round and begin searching for the targets using the angular search technique around the right side of cover. From a low ready when the targets are presented, the shooter will fire 1 round on the right target in 4 seconds.

String 2- Left side of cover: 4 seconds one iteration Standing outside of cover at a low ready position, on command the shooter will move behind cover, and begin searching for the targets using the angular search technique around the left side of cover. From a low ready when the targets are presented, the shooter will fire 1 round on the left target in 4 seconds.

Stage Two: 15 yard line, 2 strings of fire, use of cover, 4 buckshot rounds and 2 slug rounds. Instructor: Once all students are on the 15 yard line, have the shooter load the shotgun to gun box / road ready condition with 4 rounds of buckshot in the magazine tube.

String 1- Either side of cover: 8 seconds one iteration Standing outside of cover at a low ready position, on command the shooter will move behind cover, chamber a round and begin searching for the targets using the angular search technique and fire 2 rounds on each target in 8 seconds. Instructor: Have students out of battery load the shotgun behind cover with 1 slug into the chamber and in battery load 1 slug into the magazine tube.

String 2- Either side of cover: 6 seconds one iteration On command from a low ready position, the shooter will lean out from behind cover and fire 1 head shot on each target in 6 seconds.

Stage Four: 7 yard line, 1 string of fire, transition to handgun, 2 buckshot rounds and two handgun rounds.

Instructor: Once all students are on the 7 yard line have the shooter out of battery load 1 buckshot round into the chamber and in battery load 1 buckshot round in the magazine tube.

String 1- 6 seconds one iteration

On command from a low ready position, the shooter will give verbal commands and fire 1 round on each target, Transition to their handgun, and fire 1 round on each target in 6 seconds

Guidelines for Scoring the Georgia Shotgun Qualification Course (GASQ)

Slugs and handgun rounds will be scored as two (2) points each for “A” zone (center mass/central area) hits and 1 point each for hits outside the “A” zone, but still within the scoring area of the two (2) silhouettes. Total possible (maximum) points for four slugs and two handgun rounds will be 12 points. "00" buckshot will be scored as 1 point for each pellet hit within the scoring area of the (2) targets, without regard to whether the hits are in the “A” zone (center mass/central area) or the remainder of the silhouettes’ scoring area. Total possible points for the 8 pellet buckshot load is 48 points. Total possible points for the 9 pellet buckshot load is 54 points. 

Maximum Raw Score: 60 (8 pellet buckshot); 66 (9 pellet buckshot)

Minimum Qualifying Score: 48 = 80% (8 pellet buckshot); 53 = 80% (9 pellet buckshot)

In all scoring scenarios, should the perforation ring of a slug, a handgun bullet or buckshot pellet break the scoring line of any scoring area, the shooter shall be credited with the scoring value of the higher of the adjacent scoring areas and graded accordingly. Accurate scoring of the target, due to the target damage incurred as a result of short range shotgun fire, can appear to be a daunting task. Below are some tips for managing this task successfully and accurately.

Begin by assuming that all rounds have penetrated the silhouette area of the target. Because pellet rounds from the buckshot are scored with equal value regardless of where they impact the silhouette, the ‘A’ zone of the target does not carry any more weight than the rest of the target. Next, search for pellets that have impacted outside of the silhouette. Count the total number of pellets in the green area (outside of the silhouette) and subtract this number from the total possible pellet count. The difference here will be total pellet count that has impacted within the silhouette.

Buckshot only: It is acceptable to shoot the entire course utilizing buckshot, however the instructor may have to adjust the distance for the student to ensure that the ammunition used DOES NOT exceed the pattern spread at the qualification distance. 

In simple terms, if the student’s ammunition and weapon system exceeds the scoring area on the SQT A1, start the qualification course stage 1 at the 15 yard line. For the head shot portion on stage 2, incorporate it on stage 4. Leave all other stages the same.

Texas Commission on Law Enforcement Shotgun Qualification Course


FBI Shotgun Qualification Course

TARGET: FBI"Q"

AMMUNITION: 11 Slug, 5 Buckshot (00) (5 points per rifled slug, 1 point per pellet)

Agent Qualifying Score: 80%; Instructor Qualifying Score: 90%

STAGE I

STARTING POINT: 50 YARD LINE

TIME ALLOTTED: 20 SECONDS

Start from Position 1 (shotgun empty, action closed, safety on). Assembly area load 2 rounds of rifled slug into the magazine and come to Position 5 (high ready position). On command the shooter chambers a round, disengages the safety and fires 1 round standing strong side barricade and 1 round kneeling strong side barricade. Upon completing Stage I, the shooter will unload and return to Position 1 with an empty weapon and the safety on.

STAGE II

STARTING POINT: 25 YARD LINE 

TIME ALLOTTED: 45 SECONDS

Start from Position 2 with an empty weapon, action open and safety on. On command the shooter loads 5 rounds of rifled slug, fire 2 rounds strong side standing barricade and 3 rounds strong side kneeling barricade. Upon completing Stage II, the shooter will unload and return to Position 1 with an empty weapon and the safety on.

STAGE III

STARTING POINT: 15 YARD LINE

TIME ALLOTTED: 1 ROUND IN 20 SECONDS,

3 STRINGS OF 1 ROUND IN 3 SECONDS

Start from Position 2 with an empty weapon, action open and safety on. On command the shooter loads 4 rounds of rifled slug and fires 1 round in 20 seconds. The shooter then comes to Position 3 (low ready position) with the safety on. On command the shooter fires 3 strings of 1 round in 3 seconds, returning to Position 3 with the safety on after each string. Upon completing Stage III, the shooter will unload and return to Position 1 with an empty weapon and the safety on.

STAGE IV

STARTING POINT: 7 YARD LINE 

TIME ALLOTTED: 35 SECONDS

Start from Position 2 with an empty weapon, action open, and safety on. On command the shooter loads 3 rounds of buckshot, fires 3 rounds, reloads 2 rounds of buckshot, and fires 2 rounds. Upon completing Stage IV, the shooter will unload and return to Position 1 with an empty weapon and the safety on.

FBI FIREARMS INSTRUCTOR HANDBOOK 

REVISED 1/11/2000 

FIREARMS COURSES OF FIRE Part 25-4

Massachusetts Municipal Police Training Committee Shotgun Qualification Course


MPTC FIREARMS TRAINING PROGRAM

Title: 25 Round Shotgun Qualification Course w/time limits

Course Type: Qualification

Date Written: March 2, 2009 Revised: March 31, 2011

Rounds: 28 (only 25 will be fired) Distance: 25, 15, 10, 7 and 5 Yards

Passing Score: 94% for firearms instructors, 80% for all others

Scoring: Slug – 4 points for each valid hit

00 Buck (8 or 9 pellet)* – ••• point per valid hit

*If the agency only authorizes buckshot, the 18 rounds fired at the 10, 7 and 5 yard line stages will be buckshot. Slugs will always be fired from the 25 and 15 yard lines.

Fundamentals: This course of fire incorporates the fundamentals of shotgun operation and marksmanship including loading, putting the shotgun into operation, firing from different positions, tactical reloading (topping off/put back what you shoot), downloading and unloading. Additionally, officers will use good tactical fundamentals such as verbal commands, scanning, use of cover and movement.

Objectives: This course of fire was designed to better evaluate an officer’s ability to –

    ● Load the shotgun in a safe manner;

    ● Access the weapon from the vehicle storage rack (if applicable);

    ● Place the shotgun into operation;

    ● Effectively put rounds on target;

    ● Fire the shotgun from realistic shooting positions including on the move;

    ● Keep the shotgun in a “ready to fight” condition by continuously topping off the magazine;

    ● Engage threats from various angles while pivoting and on the move;

    ● Scan effectively for additional threats;

    ● Download and unload the shotgun in a safe manner.

Notes: For ease in scoring, it is recommended the course be fired with slug ammunition. In this course of fire, the term “up” is used as the cue to fire. It should be noted that any cue such as “six” or “deadly threat” can be used as well. The command to fire should be decided by the instructor based on their agency’s policy.

STAGE ONE – KNEELING FROM COVER 25 Yards 3 Rounds (slug only)

Preparation: Begin with the shotgun in the condition it is normally transported in on the 30 yard line. This can be either unloaded or “transport condition” as the department’s policy dictates. If spare ammo is not positioned on the weapon, it will be positioned on the body where it can be easily accessed. Instructors are encouraged to have their officers demonstrate their ability to remove the weapon from the storage location in the vehicle if applicable. On the command “gun” or “threat”, the shooters will access their weapon, chamber a round and advance to the 25 yard line where they will cover the threat from the kneeling position using good cover and verbal commands.

On the command “UP”, the shooters will engage the target with 3 rounds, scan while covering the target then top off their magazines. On the command to “advance”, shooters will move to the 15 yard line covering their target. Finger off the trigger – Safety ON

STAGE TWO – OFF HAND 15 Yards 4 Rounds (slug only)

At the 15 yard line, shooters will engage their targets with 4 rounds in 7 seconds from the standing position on the command “UP”. Shooters will scan for additional threats, cover the target, top off magazine and move to the 10 yard line when the command “advance” is given. Finger off the trigger – Safety ON.

STAGE THREE – PIVOT & SHOOT 10 Yards 6 Rounds

At the 10 yard line, shooters will demonstrate their ability to engage a target to the side or rear. Instructor will demonstrate the SAFETY CIRCLE and how to keep the muzzle depressed inside it when pivoting. Have shooters face in the desired direction with muzzles fully depressed. On the command “UP”, shooters will (in order of sequence) –

LOOK to identify the threat,

PIVOT to face the threat,

Bring the MUZZLE UP to the threat and

ENGAGE with ONE round in 3 seconds.

Cover – Scan – Top Off

Pivot to the LEFT – fire one round in 3 seconds. Repeat 1X (2 rounds).

Pivot to the RIGHT – fire one round in 3 seconds. Repeat 1X (2 rounds).

Pivot 180 degrees – fire one round 3 seconds. Repeat 1X (2 rounds).

Instructors should have shooters look and pivot BEFORE bringing the muzzle up on target. If you are running a crowded line or working with novice shooters, you can reduce the angle to 45 degrees so all muzzles remain in a safe direction.

STAGE FOUR – SHOOTING ON THE MOVE 10 to 7 Yds. 4 Rounds

Shooters should still be scanning from “low ready” on the 10 yard line. On the command “Advance and Engage” or “UP”, shooters will advance to the 7 yard line while firing two rounds. Once at the 7 yard line, shooters halt, scan and top off magazines. Repeat again for a total of 4 rounds. Instructors should encourage shooters NOT to stop when they shoot - keep the line moving.

Safety ON – Scan – Top off magazine if necessary

STAGE FIVE – CONTROLLED PAIRS w/ Movement 7 Yards 6 Rounds

Shooters face threat with shotgun at the low ready position. On the command “UP”, shooters will engage with two rounds then move one step laterally (left or right) as directed in 5 seconds. Scan – cover threat.

Repeat twice more for total of six rounds.

Top Off if necessary

Safety ON – Low Ready

On the command “Advance to the Five”, shooters move forward to the 5 yard line.

STAGE SIX – HAMMER DRILL 5 Yards 2 Rounds

Position shooters facing the threat with weapon at “low ready”. On the command “UP”, shooters will fire two rounds in 3 seconds in rapid succession to center mass.

DEMONSTRATE ABILITY TO UNLOAD & DOWNLOAD THE SHOTGUN

The shotgun will have 3 rounds remaining (including one in the chamber). Shooter(s) will demonstrate ability to download to Transport Mode and then unload their shotgun. If necessary, this evaluation may be conducted off the range with dummy rounds. In that case, only 25 rounds are required for the qualification course.

This skill set is part of the shotgun qualification and must be demonstrated.


Sunday, June 28, 2020

Home Defense Shotgun Qualification

Since I use a shotgun as a home defense weapon, I periodically fire qualifications with my shotguns. It is a good idea to demonstrate and document for record your competence with any firearm you might use for self-defense.

The claim of self-defense as a justification is for an intentional act, not for an accident or negligence. Demonstrating competence with your firearm can short-circuit the  prosecutor’s
potential tactic of arguing that you discharging the firearm was an accident or negligent act rather than intentional self-defense. 

What course should you use? There are several approaches you can take in choosing which course of fire to use to demonstrate competency. For the shotgun, I recommend the Department of Energy (these are the guys that guard nuclear weapons and facilities) Shotgun Qualification course or your state or local police qualification course. The Texas Commission on Law Enforcement (TCOLE) Shotgun Instructor Qualification I discuss below is what police firearms instructors must pass to receive TCOLE firearms instructor certification in Texas.

The Texas Commission on Law Enforcement (TCOLE) Shotgun Instructor Qualification course of fire is actually fairly straight forward and requires ten rounds of buckshot or five slugs and five buckshot. Given the scarcity of premium buckshot at this time, I used the cheaper Fiocchi 9 pellet buckshot.

The TCOLE qualification is fired on the standard TQ19 target with all pellets counted as one point. The shooter must score 90% to pass at the instructor level. 

The Stages:

25 yards: on command chamber and fire 3 rounds

25 yards: on command chamber and fire 2 rounds

15 yards: on command chamber and fire 3 rounds

10 yards: on command chamber and fire 2 rounds


Click on the picture below for a video of the qualification:

TCOLE Shotgun Qualification
Texas TCOLE Shotgun Qualification

I fired the qualification twice, once using a target much smaller than the TQ-19 and once using a B27 target that is closer in size to the TQ19.

My Beretta 1301 is not a 25-yard gun with the Fiocchi buckshot and will have flyers as shown on the cardboard target. Although the wads likely took out evidence of a few hits, I could only account for 78 pellets which was not a passing score. The B27 target contained all 90 pellets which was a 90 or perfect score.

If you enjoy reading these please subscribe. The link is on the upper right side of the page. All that will happen is that you will receive an e-mail when I post an article. Your information will never be distributed.

Tuesday, June 2, 2020

Java Gold—A Short Range Match Stage

In April 2010 security cameras recorded a violent attack at the Java Gold jewelry store in Houston. Three men robbed and beat the store owner and an employee. Police eventually caught all three attackers.

Mehmood Ghaznavi the store owner armed himself after this robbery and unfortunately was killed in a gunfight with Anthony Parks during an attempted robbery in a separate incident a year later on 6 July 2011. Police found Parks at the scene and transported him to the hospital with a gunshot wound to the right side of his forehead. A jury later convicted Parks of Ghaznavi’s murder and sentenced him to 40 years in prison.

This is a video of me shooting Java Gold—a Short Range Match stage that replicated the April 2010 robbery. The scenario: String #1: Starting seated at P1with hand on holstered pistol (or retention ready), draw and engage all targets with at least two rounds. You may stand or move as you deem necessary. String #2: Starting seated at P1 remove pistol from the box and engage all targets with at least two rounds. You may stand or move as you deem necessary.


The Short Range Match stage design encourages people to use proper tactics and cover. The match replicates incidents such as the Java Gold robbery on a square range. The Short Range courses of fire seek to replicate real life scenarios where you are more likely to use carry-suitable handguns. The match's guiding principle is to improve concealed carry skills and shooters ideally will use a pistol they carry to shoot the match. All pistols may be loaded to magazine capacity; however, the match may have some reloads on the clock or some malfunction drills. Although this was a static stage, we typically practice a lot of moving to cover during the Short Range Match.

You will notice that the targets are covered with old t-shirts.  I inadvertently learned a few years ago that shooters tended to shoot low when they did not have a reference aiming point--either the ability to see the down zero ring or tape on the target.  They were literally shooting "center of mass." Since then, I frequently cover the target and regulars at the match have learned to raise their aim to the proper, anatomically correct area on the target.

I have also become convinced that the typical IDPA match encourages training scars. Training scars are bad habits, inappropriate, or counterproductive actions that don’t have a basis in proper tactics. Prior to the rule change several years ago, IDPA stages often required shooters to engage targets while moving. This resulted in shooter taking baby steps as they engaged targets. Obviously if someone is shooting at you, chicken walking in the open is probably not a good idea.

Under the current rules, competitors can also engage targets while standing in the open much like USPSA stages. If cover is available you should get to it as fast as possible. Several years ago, Active Response Training published the results of an informal experiment testing the benefits of static engagement, moving and shooting, and using cover. 

Although certainly not a controlled scientific experiment, the results are interesting. Defenders who remained stationary were hit 85% of the time with 51% hit in the torso. Defenders who moved were hit 47% of the time with an 11% hit rate in the torso. Defenders who rapidly moved to cover were only hit 26% of the time with a 6% hit rate to the torso—a significant improvement in survival potential. The full article is worth the read. Click here.

I’m not bashing IDPA or USPSA; however, if you are interested in improving self-defense skills, training with scenarios like those we use in the Sensible Self Defense Short Range Match helps. IDPA, USPSA, the Short Range Match and similar contests do train us to shoot under stress and improve our speed and accuracy. The skills we practice most often are the skills we will use if called upon to defend ourselves so occasionally shooting a match using correct tactics is a good idea. You may not win the match, but it will improve your odds if you are forced to draw your pistol to defend your life.

If you enjoy reading these please subscribe. The link is on the upper right side of the page. All that will happen is that you will receive an e-mail when I post an article. Your information will never be distributed.


Thursday, May 21, 2020

Accurate Shooting at Speed

Accurate shooting at speed does not just happen on its own. Learning to shoot fast is harder than simply learning to shoot accurately because by definition you are learning to go faster than you ever have before. As IDPA Distinguished Master Gregg Kratochvil once told me: "If you want to learn to shoot fast — you have to shoot fast." You must teach yourself faster trigger manipulation, to align the sights faster, and control recoil better.

Shooting fast while hitting the target requires a balance between speed and accuracy. Push one to the limits of your skill and you'll necessarily see the other suffer. If you shoot fast, you will miss sometimes, but that is OK because accuracy does catch up with continued practice. Learning to shoot faster means pushing yourself and getting a little (but safely) out of control as you find the limit of your skills — and then pushing beyond those limits just a little.

Steel stages in general, but stages like the Ultimate Five in particular can help improve your trigger preparation, trigger control, and transitions at speed. I have often heard the phrase "slow is smooth and smooth is fast." That never made sense to me and I noticed the typical person uttering the phrase was almost always shooting slowly. We probably say it to make them feel better about being slow.  Most of the time, shooters saying this really do not understanding the underlying principles required to balance speed and accuracy. If you only practice slow, deliberate marksmanship, then the only skill you are developing is — slow, deliberate marksmanship.

In a video from a recent practice session I am shooting the Ultimate Five steel stage with a shotgun. Two runs with birdshot and two runs with buckshot. This is a stage we occasionally shoot during the Alamo Sport Shooting Club steel match and it requires pistol shooters to draw on the buzzer and shoot each target in any order. The stop plate is the last target hit. A typical steel run requires five to six shots assuming no misses.


The fastest I have seen this stage run was with a pistol caliber carbine at 1.95 seconds. The fastest with a pistol was with an Open Class race gun and the shooter fired it in 2.67 seconds from a draw—twice in a row. Likely there are pros who could shoot it faster.

Come out and shoot steel with us on the 1st Sunday of every month at Cedar Ridge Range in San Antonio. 

For more information go to the Alamo Sport Shooting Club website